How do I use the GlassFrog-OmniFocus Sync?
The GlassFrog-OmniFocus Sync Tool keeps your projects and actions in sync between GlassFrog and OmniFocus. Read on if you'd like to install the app!

Introduction
What you need to know before installing the GlassFrog-OmniFocus Sync Tool:
1) By downloading and installing the app, you agree to our Terms of Service .
2) The Sync Tool requires the Pro version of OmniFocus, and has been thoroughly tested with OmniFocus Pro 2.12 and OmniFocus Pro 3. If you are using an older version of OmniFocus, then please do not install the Sync Tool, or unexpected results may occur.
3) We recommend making frequent backups of your OmniFocus database. We worked hard to make the tool as stable and robust as we could, but it's possible we didn’t think of everything.
4) If you’re using OmniFocus Mail Drop in GlassFrog, disable it here before installing the Sync Tool: https://app.glassfrog.com/integrations
5) The Sync Tool creates a new top-level folder in OmniFocus for all sync operations. The new folder will have the same name as your organization in GlassFrog, and all changes that the tool makes in OmniFocus will happen within that new folder. This is called the “sync folder”. On the initial sync, this folder will be populated with all of your relevant GlassFrog data. Only data within the sync folder will be synced with GlassFrog. None of your pre-existing OmniFocus data will be modified or synced to GlassFrog.
6) Some common questions about the Sync Tool are answered in this article.
Getting Started
1) Download the installation ZIP file from the Integrations page in GlassFrog: https://app.glassfrog.com/integrations
2) When downloading, you may get a warning about downloading an unsafe file. This is expected, so go ahead and allow the download (in Chrome, select “keep”).
3) Double-click the ZIP file to uncompress the app file.
4) Drag the app file into your Applications folder.
5) Control-click on the app, and select “Open”. You may get a warning about the app being downloaded from the internet and/or from an unidentified developer. This is expected, so go ahead and open the app.
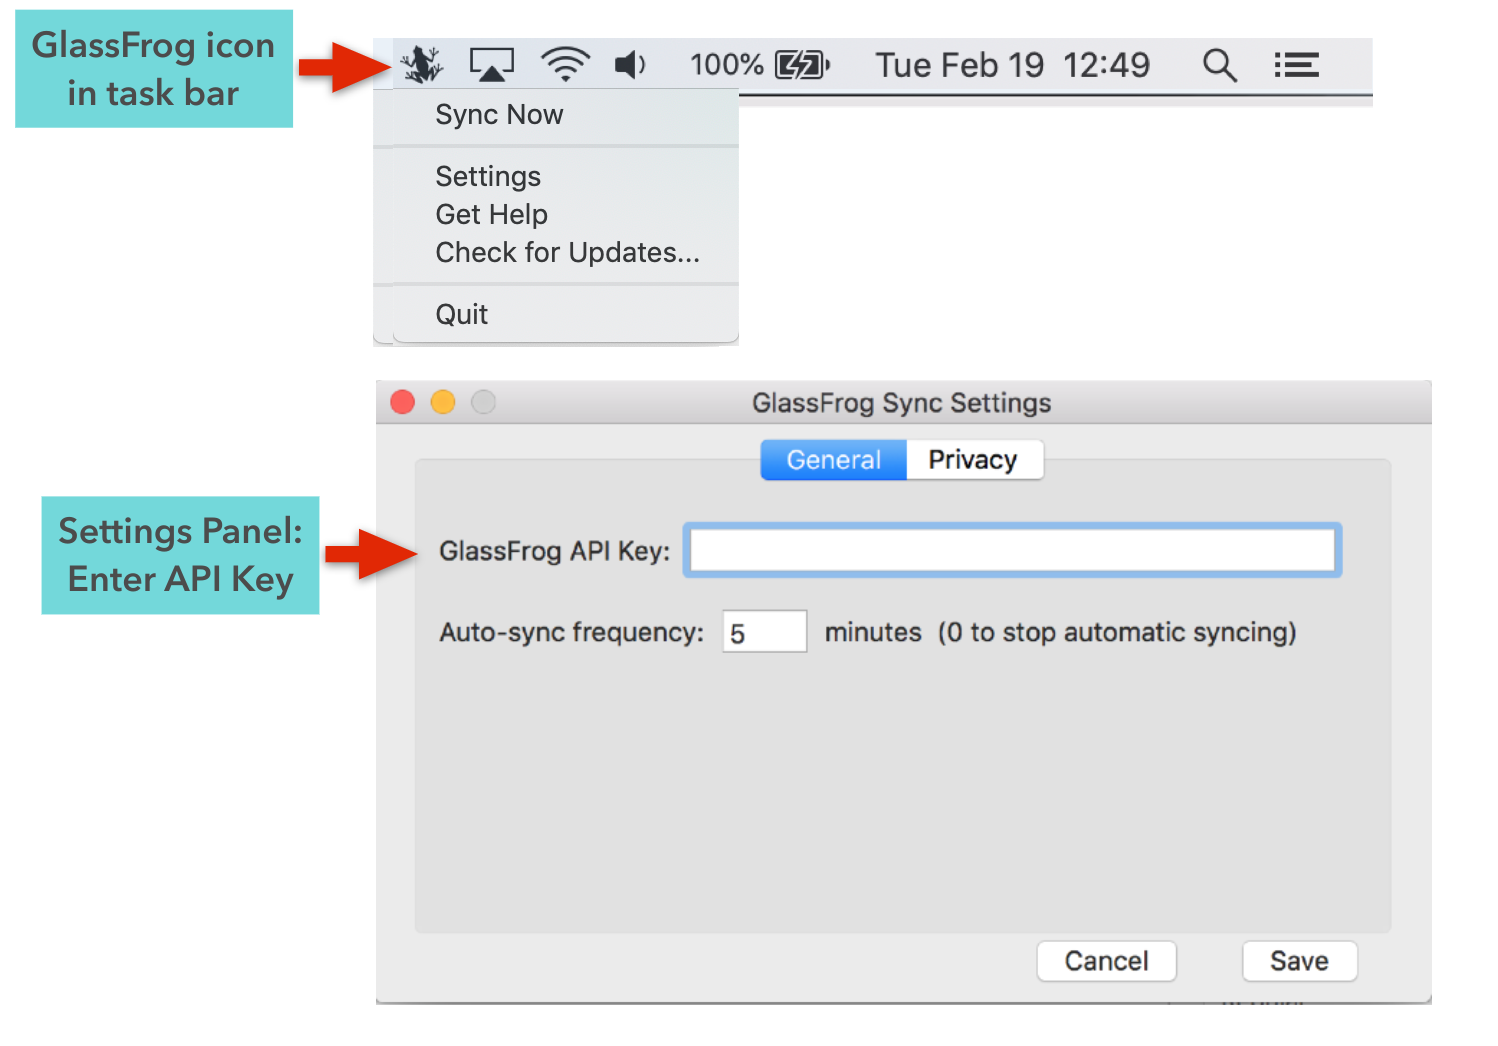
6) The GlassFrog icon will now appear in your Mac’s task bar, and the Sync Settings window will prompt you to enter your GlassFrog API key.
7) Log into the GlassFrog web app, and go to your API page: https://app.glassfrog.com/api_keys
8) Under “Your v3 API Keys”, copy the API Key that you want the Sync Tool to use. You can create a new one by typing a label and clicking “Create new API key”. If the Sync Settings window has disappeared, then click on the GlassFrog icon and select “Settings” to open up the settings panel again.
9) In the Sync Settings window, under the “General” tab, paste your API Key into the “GlassFrog API key” text box, and click “Save”.
10) Click the GlassFrog icon, and select “Sync” to start syncing the current state of GlassFrog into OmniFocus. If a sync is already in progress, then all the menu items will be grayed out until the sync is completed.
11) The sync will create a new top-level folder with the name of your organization, which will contain all of your relevant circles, roles, projects and actions.
12) Congratulations, you are now syncing between GlassFrog and OmniFocus.
Configuring Auto-Sync
By default, the Sync Tool will automatically sync changes between GlassFrog and OmniFocus every 5 minutes (configurable in Settings), but you can always run a manual sync by clicking on the GlassFrog icon and selecting the “Sync” option from the menu.
Configuring Auto-Launch
If you want the Sync Tool to automatically launch every time you log in, you can complete the following steps:
1) Open System Preferences.
2) Select “Users & Groups”.
3) Select your account under “Current User”.
4) Click the “Login Items” tab.
5) Drag the “GlassFrog-OmniFocus Sync” app from your Applications folder into the list of apps under the “Login Items” tab.
Object Deletion
When projects and actions are deleted in either GlassFrog or OmniFocus, the next time a sync happens, the corresponding object will also be deleted on the other side. There's one exception: projects deleted in GlassFrog will be "dropped" in OmniFocus, so you can still see these projects by adjusting your OmniFocus view settings.
Marking Projects as Private to Circle
When projects marked “Private to circle” in GlassFrog are synced to OmniFocus, the keyword “[circle]” will be added to the project title in OmniFocus. Likewise, when you add the keyword “[circle]” to any project title in OmniFocus, that project will be synced to GlassFrog as “Private to circle”. The “[circle]” keyword is case-insensitive, so “[CIRCLE]” also works to mark projects as private-to-circle in OmniFocus.
You can go to the Settings page -> Privacy tab to change the default "[circle]" keyword to any word that works for you. NOTE: If you have any private-to-circle projects and want to change the keyword, make sure to first temporarily disable Auto-Sync, then update all of your projects' text to use the new keyword. If you don't, any projects that are using the old keyword will become visible outside of the circle the next time you run a sync!
Marking Projects as Private to Me
Normally, all projects under the top-level sync folder will automatically sync to GlassFrog. If you want to create a project within the sync folder that doesn't sync to GlassFrog ("private-to-me"), just add the "[private]" keyword anywhere in the title of the project in OmniFocus. The “[private]” keyword is case-insensitive, so “[PRIVATE]” also works to mark projects as private-to-me in OmniFocus.
You can go to the Settings page -> Privacy tab to change the default "[private]" keyword to any word that works for you. NOTE: If you have any private projects and want to change the keyword, make sure to first temporarily disable Auto-Sync, then update all of your projects' text to use the new keyword. If you don't, any projects that are using the old keyword will sync to GlassFrog the next time you run a sync!
Sync Conflicts
This section explains the behavior of the Sync when the same object changes in both GlassFrog and OmniFocus (a “sync conflict”). Right now, changes detected in OmniFocus will override conflicting changes to the same object in GlassFrog. (Eventually there will be a configuration setting allowing you to select what they Sync should do, but for now OmniFocus will take precedence over GlassFrog.)
Problem Alerts
Occasionally the Sync Tool might not be able to complete certain operations. For example, if the tool couldn’t connect to GlassFrog due to internet connectivity issues, then this will cause an error. The GlassFrog icon will display a little red dot to indicate that there was an error. A new menu item will allow you to review the problem details. If any errors occur during a sync, then a window will appear listing the operations that couldn’t be completed. Some types of problems may be temporary, and might resolve themselves on the next sync. However, other types of problems will need to be manually resolved, for example, by making a change directly in GlassFrog to reflect the status of a project in OmniFocus.
Support
If you run into any problems with the Sync Tool, please let us know! At any time, you can select “Get Help” from the app menu to generate a report as a ZIP file that you can send to support@glassfrog.com to aid us with troubleshooting.
Additionally, if the app is about to crash, a window should automatically open with an option to immediately generate an error report.
We look forward to hearing your feedback on the GlassFrog-OmniFocus Sync Tool!